前言
学习 Kubernetes 就像玩动作游戏,当我高高兴兴地打败了一关的 BOSS 后总以为是大结局了,谁知道后面还有更大的BOSS 出现。 当我以为学习完容器化、Linux cgoup / namespace / docker 后,就可以大结局了,谁知道后面还有 CNI。
可以这么说,网络 和 CNI,是学习 Kubernetes 的深水区。通过这一关,才有可能成为 kubernetes 的舵手。要研究 k8s 网络,就要研究 CNI,而 Calico 是其中的代表。
研究一个 Cloud Native 技术,一般有两个方法入手:
-
控制面入手,从0开始,一个未安装的环境,如何一步一步地追溯到控制面建立完整,数据面准备完毕
- 通常这种方法通过文档、源码、对初始化过程的 trace 入手。
-
反向工程,数据面中捕获数据包,分析。通过底层的配置反向推出上层控制面的设计
通常,
方法1:比较科学、可控、全面、用时相对长。
方法2:用时短,但得到的结果只能说针对观察环境和配置有效。
对于开源项目,如果我们不打算做 committer,也不打算写书,那么比较经济的是方法2了。现在就开始记录一个数据包的旅行吧。
假设条件
- K8S Cluster
- 已经安装 Calico CNI
- 对 Cluster Worknode 有 root 权限
环境假设:
有两个 worker-node,
- worker-node5
- worker-node6
以下假设你已经了解 kubectl 等基础 kubernetes 命令。
部署测试用的工具
我习惯使用 netshoot。
环境:
每个 worker-node 上部署一个 netshoot pod
- worker-node5
- 部署 netshoot-w5
- worker-node6
- 部署 netshoot-w6
部署结果:

这部署图复杂得比较吓人,先不用担心,我们后面会细说,现在先看 Pod 和 worker-node 关系就好。不过建议这个图挂在另一个屏幕上,再看下文,因为,太多引用了
部署脚本:
|
|
|
|
分析
K8S 网络实现比较复杂,通讯方法多样,起码有:
- POD to POD IP
- POD to Cluster Service IP
- Worknode to POD
- Worknode to Cluster Service IP
下面,只以 POD to POD IP 为例说明。Cluster Service IP 牵扯到 kube-proxy/iptable/ipvs/conntrack等,比较复杂。
这次分析, 以 netshoot-w5/worker-node5 访问 netshoot-w6/worker-node6 的 TCP 9999 端口为例,分析IP数据流。
容器内路由 - 步骤 1、2
先关注步骤1、2。
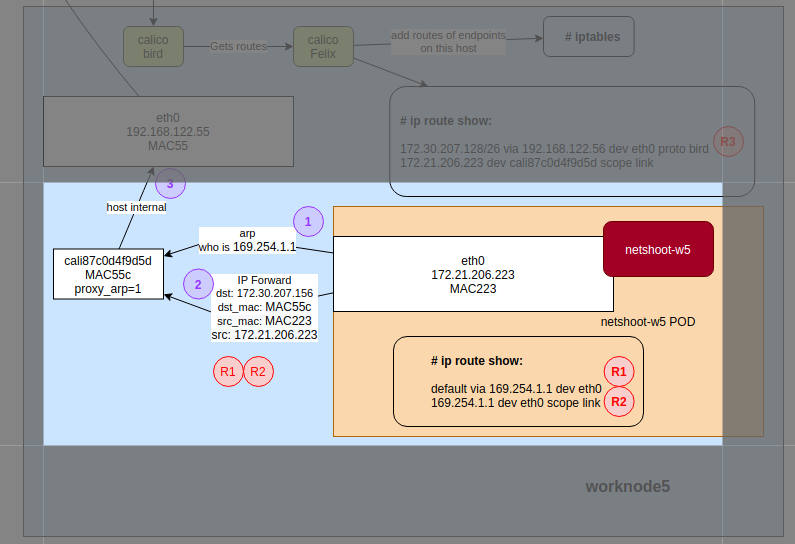
-
步骤1:netshoot-w5 的进程建立到 netshoot-w6(172.30.207.156) 的 tcp socket,发送 IP (TCP SYN) 包给 Kernel 路由层
- Kernel 路由层解释路由表 R1 ,知道包应该发给网关 169.254.1.1。但它不知道 169.254.1.1 的 MAC 地址。
- Kernel 路由层根据 R2,得知 169.254.1.1 是本地 LAN L2 层可达(即本地网)
- Kernel 路由层发出 ARP 查询包:
who is 169.254.1.1。接口cali87c0d4f9d5d返回自己的MAC地址MAC55c(实际为 EE:EE:EE:EE:EE:EE)
-
步骤2:Kernel 路由层将 IP 包发到 cali87c0d4f9d5d MAC 地址
MAC55c(实际为 EE:EE:EE:EE:EE:EE)
下面是步骤1、2的分析细节,不喜可跳过。
容器内接口
首先看看容器内的配置:
注:下面的k为 kubectl 的别名
|
|
我们知道,Linux 有一个 veth 的技术。veth 会产生两个网络接口,他们之间处于不同 net namespace,但在 L2 层相连。好吧,你可以认为这个 veth pair 是双口的以太网 hub。
回来,我们的 container 的 eth0@if14 是一端,那么它的另一半呢?每 pair 的接口均有相同的 Interface Index,而本例中为 14。所以进入 woknode5 找找:
|
|
即 cali87c0d4f9d5d 和 netshoot-w5 中的 eth0 是一个 veth pair。
容器内路由
|
|
聪明如你一定发现169.254.1.1是个什么网关或路由?我当初是众里寻他千百度,蓦然回首,那说明却在,FAQ处:
https://docs.projectcalico.org/reference/faq#why-does-my-container-have-a-route-to-16925411
Why does my container have a route to 169.254.1.1?
In a Calico network, each host acts as a gateway router for the workloads that it hosts. In container deployments, Calico uses 169.254.1.1 as the address for the Calico router. By using a link-local address, Calico saves precious IP addresses and avoids burdening the user with configuring a suitable address.
Why can’t I see the 169.254.1.1 address mentioned above on my host?
Calico tries hard to avoid interfering with any other configuration on the host. Rather than adding the gateway address to the host side of each workload interface, Calico sets the
proxy_arpflag on the interface. This makes the host behave like a gateway, responding to ARPs for 169.254.1.1 without having to actually allocate the IP address to the interface.
实践一下,cali87c0d4f9d5d 真是配置成 proxy_arp:
|
|
以下是对proxy_arp的一些说明:
Ref. https://www.dasblinkenlichten.com/getting-started-with-calico-on-kubernetes/
A host which has proxy-ARP enabled will reply to ARP requests with it’s own MAC address when…
- The host receives an ARP request on an interface which has proxy-ARP enabled.
- The host knows how to reach the destination
- The interface the host would use to reach the destination is not the same one that it received the ARP request on
So in this case, the container is sending an ARP request for 169.254.1.1. Despite this being a link-local address, the host would attempt to route this following it’s default route out the hosts physical interface. This means we’ve met all three requirements so the host will reply to the ARP request with it’s MAC address.
可见,Default Gateway 是 169.254.1.1,即 cali87c0d4f9d5d 。所有 IP Packet 均经由 cali87c0d4f9d5d 路由到 worker-node,到了 worker-node 后,就轮到看 worker-node 的路由规则了。
worker-node5 路由 - 步骤 3、4
上一节说到,worker-node 的 cali87c0d4f9d5d 收到了报文。是时候看看 host 如何路由这个报文了。
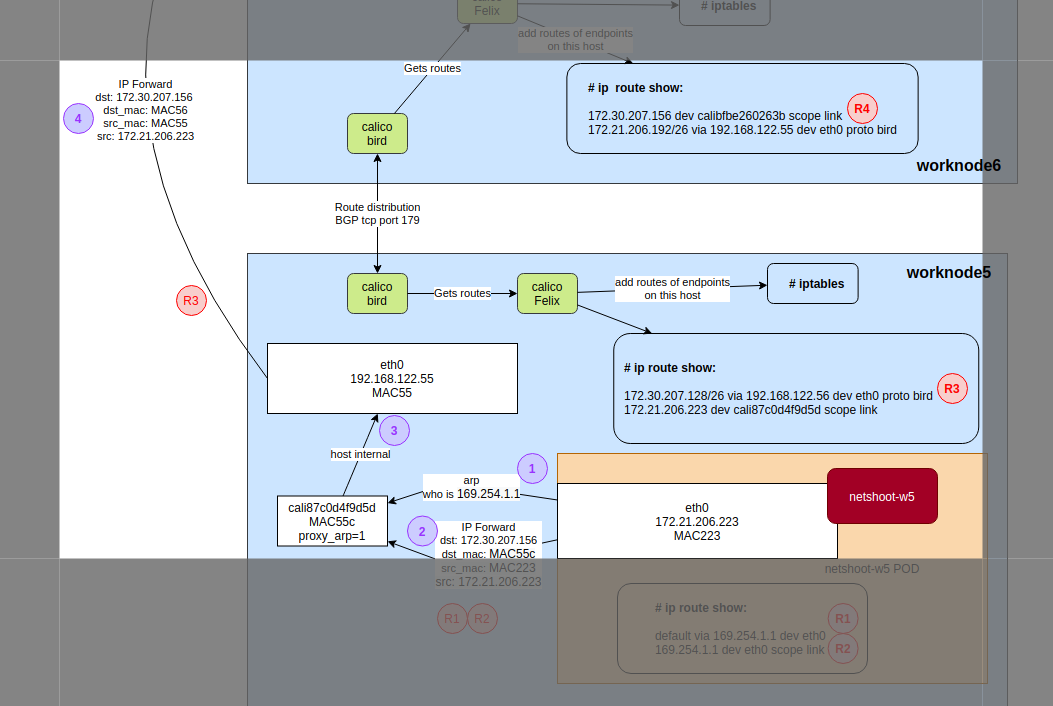
- 步骤3:Host Kernel发现目标 IP 地址(172.30.207.156)非本机,于是交由 IP Forward 策略处理。IP Forward 匹配到路由规则 R3
- 根据 R3,执行 arp 查询:
who is 192.168.122.56,返回MAC56 - 步骤4:执行路由规则 R3,从 eth0 发 IP 包到
MAC56
下面是步骤3、4的分析细节,不喜可跳过。
worker-node5 路由表
|
|
worker-node6 路由 - 步骤 5、6

- 步骤5:worker-node6收到 IP 包后,发现本机没有这个目标IP(172.30.207.156)地址,那么就视为这个IP包需要走路由(IP Forward)了。匹配到路由规则 R4,IP报文转到了 calibfbe260263b
- 步骤6:calibfbe260263b 和 netshoot-w6 容器中的 eth0 是个 veth pair,即,calibfbe260263b 收到的 L2 层数据包,netshoot-w6 容器中的 eth0 同时收到。
- 步骤7(图中没):netshoot-w6 容器中的进程收到报文,返回响应(SYN/ACK)。路径和原理类同步骤1。
分析细节与技巧
tcpdump 需要看到 L2 地址(需要 nsenter 相应的 net namespace):
|
|
总结
Calio 有很多网络方案,这里说的只是一种。但回头看看学习 Cloud Native 的路,不难发现,设计思想上的确是 Cloud Native,但实现上其实是 Old School 的 Linux 网络技术和系统隔离技术。所以,学好 Linux 才是内功。
参考
-
https://docs.projectcalico.org/reference/architecture/overview
-
https://dramasamy.medium.com/life-of-a-packet-in-kubernetes-part-1-f9bc0909e051
-
https://dramasamy.medium.com/life-of-a-packet-in-kubernetes-part-2-a07f5bf0ff14
-
https://dramasamy.medium.com/life-of-a-packet-in-kubernetes-part-3-dd881476da0f
-
https://dramasamy.medium.com/life-of-a-packet-in-kubernetes-part-4-4dbc5256050a
-
https://www.dasblinkenlichten.com/getting-started-with-calico-on-kubernetes/
-
https://static.sched.com/hosted_files/onsna19/2f/Packet_Walks_In_Kubernetes.pdf